Archive for June, 2012

Balsamic Almond-Garlic Asparagus

During the school year, I commute at least 2 hours a day.  Because I work so far away from home, I’m always looking for quick, easy, and healthy dishes for dinner.  The shorter the prep time, the better!   For this dish, you’ll need one bunch of asparagus, olive oil, minced garlic, balsamic vinegar, and sliced almonds.  To save prep time, I buy minced garlic and sliced almonds in bulk from a discount club store.   This whole recipe takes me less then 20 minutes to prep and cook, so it makes an appearance at least once a week when asparagus is on sale.

Ingredients

Rinse and trim the asparagus to remove the tough bottom parts.  I probably over-trim, but I like to make sure I get it all gone!

Trimmed Asparagus

The knife marks where I usually cut. You can see some spears that I already cut at the top of the picture.

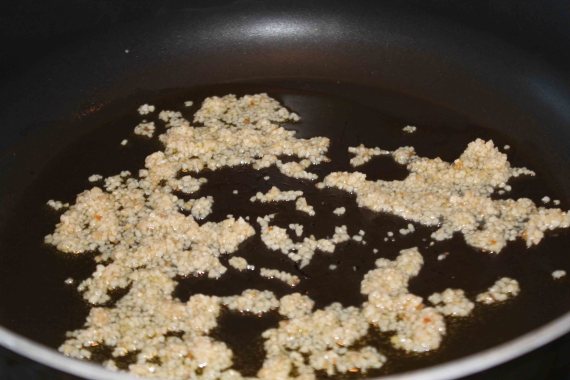
Then, place 2 Tablespoons of extra virgin olive oil in a pan on medium heat.  When it’s warmed up, add 2 Tablespoons of minced garlic and saute it for about 2 minutes.

Brown Garlic

Next, add 1/2 cup of sliced almonds, mix them up really well with the minced garlic, and saute the mix for another two minutes.

Add Almonds

Then, take the garlic-almond mixture out of the pan, and leave it resting on a plate to add back to the dish in a bit (try not to eat too much of this mixture…it is delicious!  I sometimes make just this part of the recipe and use it in salads).

Almonds and Garlic

Yummy!

In the meantime, add 1/4 cup balsamic vinegar to the pan, and simmer it for about 2 minutes to reduce it just a bit.

Reduce Balsamic

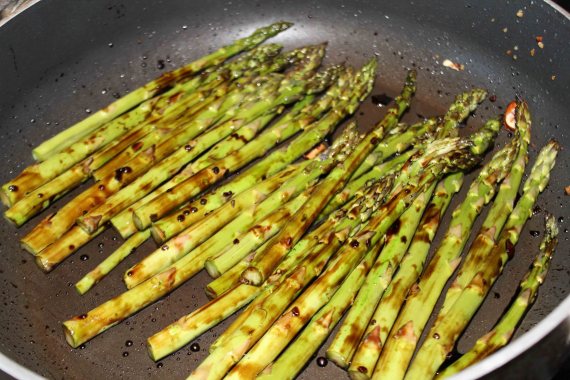
Next, add the asparagus to the pan, and mix it to make sure the spears are coated with the balsamic vinegar.  Saute for about 2 minutes, then turn the asparagus and saute for 1 more minute.

Add Asparagus

Asparagus And Balsamic

Mix the asparagus and balsamic vinegar well.


Add the garlic-almond mixture back to the pan, and mix it with the asparagus, sauteing the mixture for just 1 more minute to heat everything back to the full temperature.

Balsamic Almond-Garlic Asparagus

This goes great with chicken, beef, fish, or as a stand-alone vegetarian meal.  Plus, leftovers can be cut up into bite-sized pieces and added to salad for lunch the next day!  Delicious, healthy, and quick…no need to hit the drive through on a work night

The View from My Kitchen Window

I love looking out my kitchen window.  Even thought I live in the city, there’s a railroad easement behind us.  This old, out-of-use railroad line means there are no houses directly behind us, so I can pretend like I’m out in the country, with nothing but miles of open land and sky behind us.  Even when I’m having a totally bad day, I can look out my window and feel happy about the sun, the water, the lavender, and the big, big sky.  It really helps when you don’t want to the do the dishes, too, because this is exactly what I see when I’m doing them.   Enjoy!

View from my kitchen window


My Clean and Organized Refrigerator

Remember my dirty refrigerator from yesterday?  It’s gloriously cleaner and more organized today!  I started by taking everything out of the refrigerator:

Fridge Items

How’d all that get in there?

Then, I cleaned all the inner surfaces with cleaning wipes:

Empty Fridge

Shiny and bright!

Finally, I put everything back in, trying to keep likes with likes and cheeses with cheeses:

Clean Fridge

And for those of you playing along at home, here’s the solution to how many cheeses I had out yesterday:

Cheeses With Numbers


You’ll remember that I thought I had eight cheeses in plain view, but when I sat down and really looked at the picture, I realized I had 10 different cheeses in 11 different places.  Here’s the key…
1.  Port Townsend Creamery Red Alder
2.  Port Townsend Creamery New Moon
3.  Feta
4.  Whole Fat Mozzarella
5.  Steakhouse Onion Cheddar
6.  Sharp Cheddar
7.  Parmesan
8.  Dubliner Cheddar
9.  American
10.  More Sharp Cheddar
11.  Part-skim Mozzarella

I guess it’s time for some grilled cheese sandwiches?  Or maybe some homemade mac and cheese?  Either option sounds good to me!

My Dirty Refrigerator

I’ve been traveling the past couple weeks for a conference and a baby shower, and am finally getting back into the swing of things back at home.  I opened my fridge this afternoon, to figure out what to make for dinner, and this is what I saw:

My Dirty Fridge

Notice the precariously stacked plastic containers next to the gallon of milk?  The two different types of pizza sauce (both opened) on the shelf above the sodas?  Here’s a close up:

Top Shelves

I didn’t realize I had so many different types of cheeses on the top two shelves alone (Eight in all…can you spot them all?  I’ll post the answers tomorrow).  So, take a look at my dirty fridge and feel better about your own housekeeping skills today!  We’ll see how successful my cleaning skills are tomorrow…

Round Rock Donuts

I’ve been in Austin, Texas this past week to visit with my cousins and attend my cousin’s baby shower.  They love to indulge my inner foodie, and always introduce me to new and tasty places to eat.  This trip has been no different – from Mighty Burgers, to Gigi’s Cupcakes, to the subject of today’s post – Round Rock Donuts. 

 Round Rock Donuts

Just north of Austin is the city of Round Rock, and home to Round Rock Donuts.   Donuts, breads, kolaches, and other pastry items are available, and they are all yummy!  You walk in, place your order, pay, and warm kolaches and donuts are soon delivered into your eager hands!  I had the sausage and cheese kolaches:

Kolaches

and a glazed donut and a chocolate donut:

Donuts

Definitely worth the drive north from Austin!

Mouth-watering Pork BBQ Ribs

For Fathers’ Day dinner last night, I decided to make my California version of BBQ pork ribs for my Texas cousins.  I always struggled to make my ribs fall-off-the-bone good, like I like them.  So, I started to experiment a few years back, and came up with this surefire recipe that never lets me down (even when compared to Texas BBQ!).  Let me preface the recipe by saying that I like sweet, non-smoky BBQ, so that’s how I make my ribs.  But, the cooking technique is what makes it work.  You could use the cooking technique and substitute your own favorite BBQ flavorings in place of mine.  Here’s how I do it:

 Ingredients

Start with some (a rack or two) extra meaty pork ribs (wait for them to go on sale, though, before you buy them), salt, pepper, Italian seasoning, and aluminum foil.  Preheat your oven to 275 degrees.  Layout one strip of aluminum foil, longer than the rack of ribs, which will run parallel to the ribs.  Then, two more strips perpendicular to the original sheet of foil that will help seal up the ribs for cooking.  Open up those juicy ribs and remove the membrane like this:

 Removing the membrane 

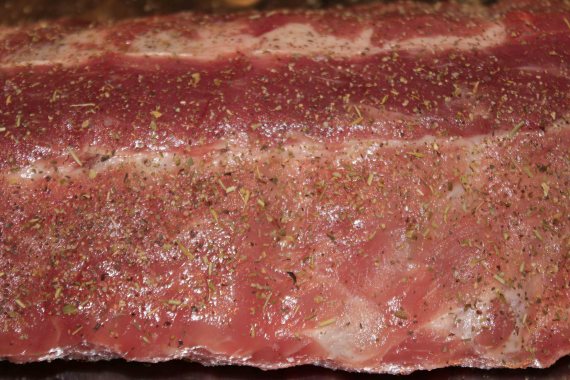
Once the membrane is removed, move the rack of ribs to the aluminum foil, and season with salt, pepper, and Italian seasoning to taste on both sides of the ribs.  Here’s what mine looks like:

Seasoned Meat

Next, seal up the aluminum foil, starting with one side of the perpendicular pieces, then both sides of the parallel piece, then the other side of the perpendicular pieces.  It should like roughly like this:

Foiled Ribs

Place the aluminum foil-wrapped rib rack (or racks) on cookie sheets, meaty side up if you don’t like the meat to sit in its own fat or meaty side down for juicier, fattier (is that a word?) ribs.  Bake for 2 1/2 hours at 275 degrees.  It’s going to smell so good!  At the end of those 2 1/2 hours remove the ribs from the oven and aluminum foil, and baste them with your favorite BBQ sauce (I love Sweet Baby Ray’s Hickory and Brown Sugar). 

Basting Ribs

Then, take those bad boys (the ribs) out to the grill, and grill them just long enough to get a nice carmelization on the sauce.  They should look something like this:

Ribs on the Grill

Pull them off the grill, cut them up into individual ribs, and add a little extra sauce to them.  Then, serve them to the masses and say thank you when they tell you how good your ribs are!

Finished Ribs

Happy Fathers’ Day!

It’s Fathers’ Day, and I’m thinking about all the great fathers I know…my dad, the boyfriend, uncles, cousins, friends, etc.  What makes them great?  It’ the way they hug you to make you feel better when you have a boo boo (and continue to pick you up when you need it as you grow older).  It’s knowing they’ll always be there to catch you if you fall (which gives you the courage to go after your dreams).  It’s the way they constantly brag to their friends and family about how their kid is “the best” at whatever they do (and sometimes what they haven’t done – to this day, my dad swears I would have been the next Diane Sawyer if only I’d have become a news anchor).  It’s the way they scare your boyfriends to make sure they’re good enough for you.  It’s the way they teach you how to do the things they do…in my case, this involved farming, paleontology, lapidary and gold panning, hunting, reading, astronomy, eating, and lifelong learning.  So, here’s to you dads…thank you for all you do and all you will do for us.  Enjoy your day!

Fathers Day

Chocolate Chip Cupcakes

I’m in Austin this weekend for my cousin’s baby shower (Yeah!), and just discovered a new cupcake store!  I’m not a huge cake or cupcake fan, but I LOVED the Chocolate Chip Cupcake I had at Gigi’s Cupcakes, a franchise cupcake store found mostly in the South and the Midwest (thank goodness for me!).   Look at this delightful confection!

Chocolate Chip Cupcake

YUMMY!!!

I have never made Chocolate Chip Cupcakes before, but I had to google it after I ate such deliciousness!  I found a very yummy sounding recipe at Annie’s Eats.  Check it out!

When in Port Townsend, WA

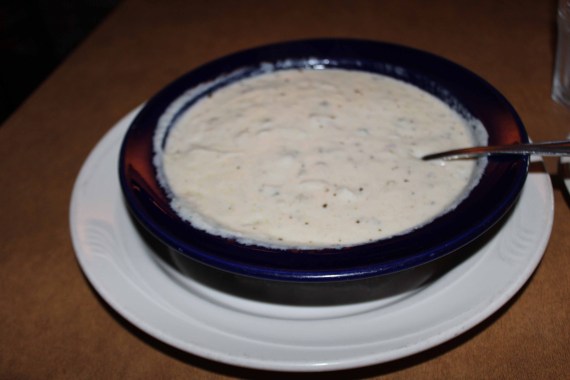
On my recent visit to Port Townsend, WA, I visited many yummy restaurants on the advice of my hotel staff, eavesdropping, and Yelp.  I thought I’d share with you what I ate.  I stopped at the Silverwater Cafe* (www.silverwatercafe.com) for dinner, and had a great bowl of clam chowder, the best crab ravioli in tomato and red pepper sauce, and an ok (not great) molten chocolate cake.  It is a little more expensive, sit down, relaxing atmosphere kind of restaurant.  With tip and taxes, I spent about $48.  Here’s what the dishes looked like:

Clam Chowder

Out-of-focus Clam Chowder

Best Crab Ravioli

Best Crab Ravioli Ever!

Chocolate Lava Cake

Looks great, but was a little dry.

On my second night, I overheard a shop owner tell some other tourists to try Waterfront Pizza* (http://www.facebook.com/pages/Waterfront-Pizza/61382185589).  My pizza was so good that I ate half of it before I remembered to take a picture of it for you!  This place is very laid back and casual, with a walk up ordering window at street level, and a pretty small dining area upstairs.  Expect a little wait if you want to eat there.  The cool thing is that they let you order while you wait, so your pizza is ready shortly after you sit down!

Waterfront Pizza

Yummy Artichoke and Tomato Pizza!

Port Townsend is a fun, cute little town, so check it out if you get a chance!

*I’m not affiliated with either of these restaurants; I just really liked their food!


Uncomplicated Container Gardening Prep

I love cooking with fresh herbs, but they can be so expensive to buy!  So, I decided to start my own year-round herb garden this spring.  I started my basil seedlings inside in February, because I wanted to get a head start.  I want to be able to move my herb garden to warmer locations in winter, so I’m using light, large resin containers that I’ll be putting on casters for easy transportation.  Here’s a pic:

Container for Container Gardening

You need to make sure you allow for drainage when container gardening, so make sure you put at least one hole in the bottom of your outdoor planters.  I used this tool I found in the boyfriend’s toolbox (not sure what it is – leave a note in the comments if you know what it’s for!). 

Tool

I made  nice size hole, and then filled in the bottom of the containter with rocks from my garden for additional drainage help.  (With a container this size, I probably should have put in 3 holes, but I was feeling lazy that day, so hopefully the rocks will compensate.  I’ll let you know how it goes!)

Finished drain

Finished drainage hole

Rocks for drainage

Rock layer for additional drainage

Once you have all that out of the way, get your strong significant other to put the heavy potting soil into the container (I used 2 cubic feet of soil in these planters).  Be sure you’ve purchased the right soil for containers – I bought the wrong stuff the first time!

Add Soil

Once the soil is mostly in, position your seedlings where you’d like them,

Place your seedlings

dig little holes to put them in,

Dig holes for planting

and plant them!

Planted

Notice how my seedlings seem a little lanky (tall, floppy, and skinny)?  That’s not how you want them to be.  I made the mistake of keeping my seedlings too far from their light source indoors.  I was lucky they survived!  Once you’ve planted these babies, gently water them thoroughly.  You really want to keep an eye on watering when using containers, as they dry out faster than tradiational gardens. 

Gentle Watering

My little basil seedlings took off, and were thriving.  Unfortunately, I wasn’t able to get a picture of them for you.  Why?  My cats discovered the basil, and over the course of two days, ate it all.  This is what I found when I went to take the photo:

What the Cats Left

So, it’s back to square one!